Dear reader,
My blog has been moved to a brand new location – Excel.city
See you there! 🙂
Posts in English
Recently I found a PowerQuery gem, trick with Java/VB Script that allows to export data from Power Query to CSV without R / DAX Studio / SMS and Registration. However, related with risk. As everything else in our life.
Kudos to user Shi Yang from Stack Overflow who replied to How to write to DATA sources with Power Query?.
Shi proposes to use following code (extended with my comments)
Let
     // reference to a query you wish to export to CSV
    Source = ReferenceToYourTableOrQuery,
     // demote headers to have headers in resulting CSV
     // if you don't need headers, remove Table.DemoteHeaders
     Json = Text.FromBinary(Json.FromValue(Table.ToRows(Table.DemoteHeaders(Source)))),
     // trigger execution of script
  Export = Web.Page("
 var fso=new ActiveXObject('Scripting.FileSystemObject');
 var f1=fso.CreateTextFile('C:/Temp/test.csv',true);
 var arr=" & Json & ";
 f1.WriteLine(arr.join('\n'));
 f1.WriteBlankLines(1);
 f1.Close();
 ")
 in Export
All great, but this method doesn’t work with default settings of Internet Explorer.
This post continues series of articles about M Function List.Zip ( first post, second post).
Table.TransformColumns is another function that requires list of pairs if you want to transform several columns in Power Query
![]()
When we want to transform all fields we can simply use
Table.TransformColumns(#"Changed Type", {}, Text.Trim)
// would be great to see same behaviour for Table.TransformColumnTypes
However, when we need to change only part of the table we have to generate list of pairs {column name, function}.
Text.Trim highlighted in last sample is a good example of transformation function.
In general, transformation function can contain any logic and can transform objects of any type.
This is my second post about List.Zip. First one was about general usage of List.Zip, where I touched question of transforming column types in Power Query.
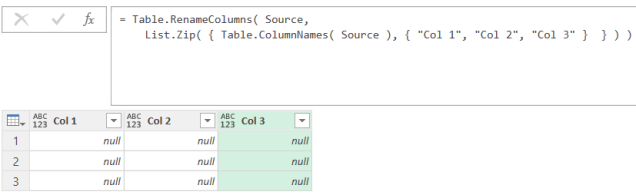
Another scenario where List.Zip can be used – renaming columns in Power Query.
When you rename columns manually, auto-generated function looks like
Table.RenameColumns( Source,
     { {"Column1", "Col 1"},
     {"Column2", "Col 2"},
     {"Column3", "Col 3"}} )
As well as Table.TransformColumnTypes, it requires list of pairs {“Old Name” , “New Name” } for its second argument.
List.Zip helps to create list of pairs:
Table.RenameColumns( Source, List.Zip( { Table.ColumnNames( Source ),
    { "Col 1", "Col 2", "Col 3" } } ) )
Result:
When we have, so called, “RenamingTable”, which contains two columns, first – with old name, second – with new name, we can use following pattern
Table.RenameColumns( TargetTable,
    Table.ToColumns( Table.Transpose( RenamingTable ) ),
    MissingField.Ignore )
You can read more detailed explanation in one of my previous posts.
Using List.Zip, we don’t need RenamingTable, as we can generate new names on the fly by using following pattern
There is one useful Power Query M function – List.Zip, but with poor documentation on MSDN.
I hope, at some point, library of M functions will be available on Github like it is done for VBA. Power Query enthusiasts then would get a chance to contribute. E.g. from MSDN page of Workbook object we can go to Github and make a pull request for changes.
I plan 2-3 posts about application of List.Zip, this is the first one.
Let’s start from “Help” in Power Query editor, it shows simple sample

Note: to get help on function – type name of function in formula bar and press Enter. Pay attention to register, M is case sensitive.
Having short documentation directly in power query editor is great idea! However, it is hard to show all scenarios with function and keep documentation short. In this particular case, it might be not obvious what happens when we have list of lists with more than 2 elements, or lists with different number of elements, or with more than two lists. Continue reading
Just a short post today. I’ve updated my Power Query cheat sheet and created repository on Github so anyone can now contribute.
Good news for Russian-speaking readers. Шпаргалка теперь доступна на русском языке. Ура!
If you want to have this Cheat Sheet in any other language – just translate it and send me a pull request. Too difficult? Then send me an email with translated .docx attached.
Have several ideas for “PQ shortcuts” section, so stay tuned.
Go to Github and get your copy of Power Query cheat sheet.

Usually, I use Power Pivot and VBA in Excel to measure Power Query performance by comparing refresh time.
But, I suppose Power BI Desktop refresh process may be different, therefore would be nice to have something that would allow measure time between start and end of refresh.
Unfortunately, we do not have VBA in Power BI Desktop, nor can trigger and monitor refresh of Power BI Desktop from another application. So, we have only M and queries.
For the experiment I’ve created a new Power BI Desktop file, three queries in it, and put queries in order Start-Delay-End

Start
= DateTime.LocalNow()
Delay
= Function.InvokeAfter(()=> DateTime.LocalNow(), #duration(0,0,0,3))
End
= DateTime.LocalNow()
“Delay” must make a 3-seconds delay. You may read about Function.InvokeAfter in old good post from Chris Webb.
The idea is naive – hope that Power BI Desktop will execute queries in the same order as in the list of queries.
If so – query “Start” will load start time, Delay will make a pause, then “End” will load time of the end of refresh.
However, by default, Power BI Desktop loads tables in parallel, to optimize load time.
This property can be found in Options -> Current File ( Data Load ) -> Enable parallel loading of tables

This really works. I was receiving same time for Start and End tables while this property was enabled.

When I disabled it, I finally got desired difference between Start and End

Then I changed order of queries in the list of queries to check whether it impacts on execution order

Result shows that “Yes – order does matter“:

Of course, Power Query engine must be generating Execution plan when user press Refresh and then follows it. But in simple scenarios, when “Parallel loading of tables” is disabled, seems like Power BI Desktop follows order of queries from Query Editor.
I have no groups of queries, have no references between queries etc. It allowed me to check load time.
I tried to use same technique in more complex file – with groups of queries (but with no references).
I created query “Start” and placed it into the first group.
Similar for “End” query – but in the last group.

Result seems correct

Above is, of course, not a serious solution. Mainly, because you won’t want to disable parallel loading of tables, and won’t rely on order or queries.
Nevertheless, it would be good to have total refresh time directly in the model. It would allow to monitor refresh time of growing datasets.
More sophisticated way of query engine processing analysis is hidden in diagnostics of trace logs. You may read about this in several posts from Chris Webb here, here, and here.
What if part of your reporting database is a set of CSV files?
Apart from possible problems with different number of columns, data types, delimiters, encoding etc., you have to care about performance.
According to my practice, large number of files kills productivity. It is better to firstly combine CSV / TXT files into one, then use Power Query to load it.
As some of my readers know, I recently moved from Moscow to Sydney. Huge change in my life, and it required a huge effort from me. From March I was busy with English exam, paper work, visa, preparation of goods transfer, then with transfer itself, then with finding apartment, buying furniture, household goods, taking over things at work, diving into new area and responsibilities, enrollment to school etc.
Thanks to Matt Allington for warm welcome in one of my first days in Sydney. For me it was like “coffee with legend”. After years of reading Matt’s articles, I could met him in person. This is inspiring!
Year ago I couldn’t even imagine such turn in my life.
So, I was a bit busy and had no time to write new posts.
However, I’m still passionate about Power Query, M, Excel, VBA, and Power BI will join this list very soon, as I’m officially start to work with it.
What is interesting, I’m now in “No-SQL world”, which means that I have no SQL Server to store data.
And I’m happy, as it is a chance to build reporting solution with no such luxury as servers.
Folders and Files – stored on local drive / network drive / SharePoint – great data base! There are million reasons why not, but it is still great!
Cheap, portable, flexible, scalable to a certain level, and what is important – still a good source for Power Query, no matter if resulting model is in Excel or Power BI.
Another important element from my point of view – availability to “small people”, analysts or reporting specialists, accountants etc. – people with no admin rights, knowledge of SQL etc.
I call it “Self-Service BI for poor”. Even when company is rich enough, has expensive ERP, IT governed business intelligence etc., I’m pretty sure, such Excel-DIY solutions appear here and there, as far not every analyst has access to serious IT solutions, or IT is not fast enough.
I still keep in mind one of old posts from Chris Webb: Why Corporate BI and Self-Service BI Are Both Necessary.
To wrap up, in near future you may expect posts covering interesting (and not) problems related to the situation when your data base is set of files.
Stay tuned!
Recently Teo Lachev released a very short but important post about Automation Excel to PowerBI publishing.
In a nutshell: now we have a VBA method PublishToPBI, which allows to publish workbooks to PowerBI.
This is quite interesting scenario for Excel-based Self-Service BI solutions.
I played around with this method, and share with you results of my experiments.
Unfortunately, there is no official documentation yet. At least in the list of Workbook Methods.
Below is my modest attempt.
Purpose
Publish workbook to PowerBI as a report or dataset.
Requirements
Syntax
expression.PublishToPBI( PublishType, nameConflict, bstrGroupName )
expression a variable that represents a Workbook object.
Parameters
| Name | Required/Optional | Data Type / Description |
| PublishType | Optional | Enum XlPublishToPBIPublishType
msoPBIExport = 0, publish workbook as a dataset. Workbook must contain Table Data (range formatted as a Table) or Data Model (aka PowerPivot model). msoPBIUpload = 1 (default) publish workbook as a report, which can be consumed in Excel Online directly in PowerBI. |
| nameConflict | Optional | Enum XlPublishToPBINameConflictAction
msoPBIAbort = 1 (default), workbook will not be loaded to PowerBI if there already exists workbook with same full name (including extension) msoPBIIgnore = 0, ignores existence of report / dataset and creates new one on Upload/Export. msoPBIOverwrite = 2, overwrites existing report / dataset with same full name of workbook. Note: method raises an error if find more than one report / dataset with same full name (e.g. if msoPBIIgnore was used previously). |
| bstrGroupName | Optional | String
Name of target Workspace. If omitted, method loads workbook to “My Workspace” of signed-in user. Note: requires Pro-account, signed-in user must have edit rights in target workspace. |
Example
' Creates Dataset from ActiveWorkbook in workspace "Finance Team" (if signed in user has access to it)
ActiveWorkbook.PublishToPBI nameConflict:=msoPBIOverwrite, bstrGroupName:="Finance Team", PublishType:=msoPBIExport

' Creates PowerBI Report from ActiveWorkbook in signed in user's workspace
ActiveWorkbook.PublishToPBI nameConflict:=msoPBIOverwrite, PublishType:=msoPBIUpload

' Creates Dataset from ActiveWorkbook in signed in user's workspace
ActiveWorkbook.PublishToPBI nameConflict:=msoPBIOverwrite, PublishType:=msoPBIExport
